Guitar Headphone Amplifier
CompletedProject Overview
A compact and portable headphone amplifier specifically designed for guitar players who want to practice silently without disturbing others. This project delivers high-quality sound output through headphones, allowing guitarists to practice anywhere and anytime with professional tone quality.
The amplifier is battery-powered for true portability and features adjustable gain control to accommodate different playing styles and guitar types. Whether you're practicing at home late at night, traveling, or just want to focus on your playing without external distractions, this headphone amp is the perfect solution.
Built using readily available components and an operational amplifier-based design, this project is both easy to build and highly functional. The addition of an auxiliary input makes it possible to play along with backing tracks from your phone or MP3 player.
Key Features
Portable Design
Small and lightweight form factor, perfect for practicing on the go or traveling
High-Quality Sound
Delivers clear and rich tones with low distortion and excellent frequency response
Battery-Powered
Uses standard 9V lithium-ion battery for long-lasting, convenient operation
Gain Control
Adjustable gain via potentiometer to suit different playing styles and guitar outputs
Aux Input
Play along with backing tracks from your phone, tablet, or MP3 player
Easy to Build
Simple circuit design using standard components, perfect for DIY enthusiasts
Components & Bill of Materials
The amplifier uses readily available, affordable components that can be sourced from most electronics suppliers:
Active Components
- Operational Amplifier (Op-Amp): TL072 or similar dual op-amp IC for audio amplification with low noise
- 9V Battery: Standard 9V lithium-ion or alkaline battery for portable power supply
Passive Components
- Resistors: Various values for gain setting, biasing, and signal conditioning
- Capacitors: Electrolytic and ceramic capacitors for coupling, decoupling, and filtering
- Potentiometer: 10kΩ or 100kΩ linear pot for adjustable gain/volume control
Connectors & Mechanical
- 1/4" Guitar Input Jack: Standard mono jack for guitar connection
- 1/8" Headphone Output Jack (3.5mm): Stereo jack for headphone connection
- 1/8" Aux Input Jack (3.5mm): Stereo jack for external audio source (backing tracks)
- 9V Battery Connector: Snap connector for easy battery replacement
- Power Switch: SPST toggle or slide switch for on/off control
PCB & Enclosure
- PCB (Printed Circuit Board): Custom PCB or perfboard for component mounting
- Enclosure: Small aluminum or plastic enclosure for housing the circuit and protecting components
Circuit Architecture & Block Diagram
The guitar headphone amplifier uses a simple yet effective op-amp-based architecture designed for audio signal amplification with minimal distortion. The circuit consists of several functional blocks:
Signal Flow
- Input Stage: Guitar signal enters through 1/4" jack, with input impedance matching to prevent signal loading
- Pre-Amplification: First op-amp stage provides voltage gain to boost guitar signal to line level
- Gain Control: Potentiometer allows user to adjust amplification factor for volume control
- Mixing Stage: Aux input is mixed with guitar signal, allowing backing track playback
- Output Buffer: Second op-amp stage provides low output impedance to drive headphones
- Headphone Output: Final signal delivered to 1/8" jack for headphone connection
Power Supply
The circuit operates from a single 9V battery with proper decoupling capacitors to ensure clean power delivery and minimize noise. A voltage divider creates a virtual ground at 4.5V for biasing the op-amps in single-supply mode.
Circuit Schematic
The schematic shows the complete circuit design with all component values, connections, and biasing networks. The design uses a dual op-amp IC (TL072) to minimize component count while maintaining excellent audio performance.
Key Circuit Sections
- Input Coupling: AC coupling capacitor blocks DC while passing audio signals from guitar
- Biasing Network: Voltage divider creates 4.5V reference for single-supply operation
- Gain Stage: Non-inverting amplifier configuration with adjustable gain via potentiometer
- Frequency Response: Capacitor values chosen for flat response across guitar frequency range (80 Hz - 5 kHz)
- Output Stage: Low-impedance buffer capable of driving 16-600Ω headphones
- Power Filtering: Decoupling capacitors (100μF, 0.1μF) ensure stable operation and reduce noise
How to Use
Operating the guitar headphone amplifier is straightforward. Follow these steps to get started:
Setup Instructions
- Connect Your Guitar: Plug your guitar into the 1/4" input jack using a standard guitar cable. Ensure the connection is secure for best sound quality.
- Connect Headphones: Plug your headphones into the 1/8" (3.5mm) output jack. The amplifier works with most headphone impedances (16Ω to 600Ω).
- Install Battery & Power On: Insert a fresh 9V battery into the battery connector and switch the amplifier on using the power switch. An LED indicator (if installed) will confirm power status.
- Adjust Gain: Start with the gain potentiometer at minimum. Strum your guitar and gradually increase the gain to your desired volume level. Adjust to match your playing style and guitar output.
- Optional - Play Along with Backing Tracks: Connect your smartphone, tablet, or MP3 player to the auxiliary (aux) input jack using a 3.5mm audio cable. Your backing tracks will mix with your guitar signal, allowing you to practice along with music.
Tips for Best Performance
- Battery Life: Replace the 9V battery when you notice reduced volume or distorted sound
- Gain Setting: Lower gain settings produce cleaner tones; higher gain adds more sustain and drive
- Headphone Selection: Use quality headphones (32-80Ω impedance) for best frequency response
- Cable Quality: Use shielded guitar cables to minimize noise and interference
- Storage: Remove battery when not using the amp for extended periods to prevent leakage
Construction & Assembly
Building the guitar headphone amplifier is a great project for learning analog circuit design and PCB assembly. The construction process involves several steps:
PCB Fabrication & Assembly
- PCB Design: Create PCB layout using KiCad, Eagle, or similar PCB design software based on schematic
- PCB Ordering: Order PCBs from JLCPCB, PCBWay, or similar manufacturer (typically 5-10 pieces minimum)
- Component Placement: Solder components starting with lowest profile (resistors, diodes) then ICs, capacitors, and connectors
- Soldering: Use proper soldering technique with appropriate tip temperature (350°C) and quality solder
- Inspection: Check for solder bridges, cold joints, and correct component orientation (especially electrolytic capacitors and ICs)
Enclosure Integration
- Drill Holes: Mark and drill holes in enclosure for jacks, potentiometer, switch, and LED
- Mount PCB: Secure PCB inside enclosure using standoffs or mounting brackets
- Wire Connections: Connect battery, switch, and panel-mounted components to PCB
- Final Assembly: Close enclosure and apply labels for input/output jacks and controls
Testing & Calibration
- Visual Inspection: Double-check all connections and component values before applying power
- Power-On Test: Measure supply voltage and verify proper biasing (4.5V at op-amp inputs)
- Signal Test: Connect signal generator or guitar, verify amplification and frequency response
- Audio Quality Check: Listen for noise, distortion, or frequency roll-off; troubleshoot if needed
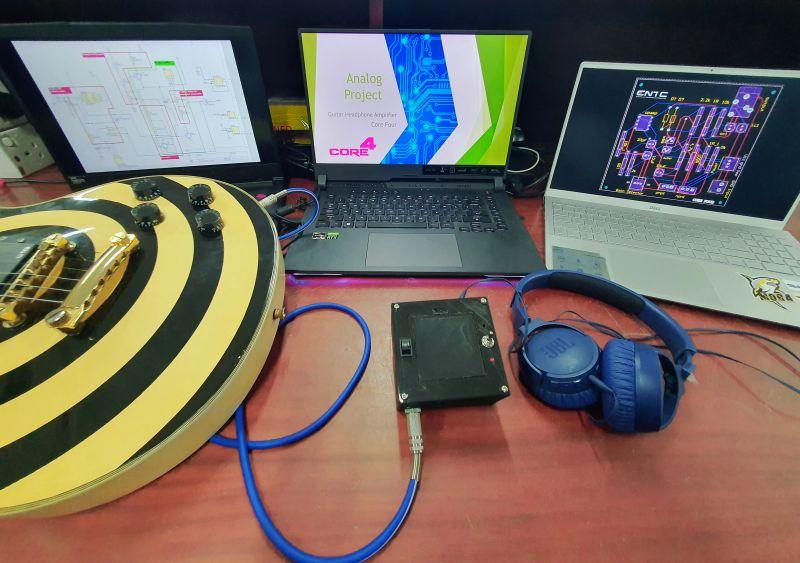
Complete Setup at Demonstration Day
Full demonstration setup showing the amplifier connected to headphones with multiple laptops displaying project documentation, schematics, and PCB layouts.
Performance Specifications
The guitar headphone amplifier delivers excellent audio performance suitable for practice and casual recording:
| Parameter | Specification |
|---|---|
| Supply Voltage | 9V (Battery) |
| Current Consumption | ~5-10 mA (typical) |
| Input Impedance | 1 MΩ (guitar input) |
| Output Impedance | < 100Ω |
| Headphone Load | 16Ω - 600Ω |
| Voltage Gain (Adjustable) | 1x - 100x (0 - 40 dB) |
| Frequency Response | 20 Hz - 20 kHz (±1 dB) |
| Total Harmonic Distortion (THD) | < 0.1% @ 1 kHz |
| Signal-to-Noise Ratio (SNR) | > 80 dB |
| Battery Life | ~20-40 hours (typical use) |
Tools & Technologies
Applications & Use Cases
- Silent Practice: Practice guitar at any time without disturbing family, roommates, or neighbors
- Travel Companion: Take your practice setup anywhere - hotel rooms, dorms, backstage, on tour
- Late-Night Sessions: Perfect for night owls who want to practice after everyone else is asleep
- Recording Monitoring: Use as a headphone monitor when recording direct-input guitar tracks
- Jam Along: Practice with backing tracks, lessons, or songs from your phone via aux input
- Apartment Living: Ideal for guitarists in apartments where noise complaints are a concern
- Learning Tool: Great for beginners who want to focus on technique without external distractions
- Professional Warmup: Warm up before gigs or recording sessions with portable, quiet practice
Future Enhancements
Potential upgrades and modifications to improve the design:
- Tone Control: Add active or passive EQ circuit for bass, mid, and treble adjustment
- Effects Loop: Include send/return jacks for inserting external effects pedals
- Overdrive/Distortion: Implement clipping circuit for overdriven guitar tones
- Rechargeable Battery: Replace 9V battery with USB rechargeable Li-ion battery pack
- Stereo Output: Modify circuit for true stereo output with stereo effects
- Cabinet Simulation: Add speaker cabinet simulation circuit for more realistic amp tone
- Multiple Inputs: Support for multiple instruments (bass, keyboards, etc.) with input switching
- Bluetooth Audio: Add Bluetooth module for wireless backing track streaming
- LED VU Meter: Visual signal level indicator for monitoring input/output levels
Key Learnings
- Op-Amp Audio Design: Practical experience designing audio amplifier circuits with operational amplifiers
- Single-Supply Biasing: Understanding virtual ground creation and biasing techniques for single-supply operation
- Audio Signal Chain: Knowledge of signal flow from guitar pickup through amplification to headphone output
- Impedance Matching: Importance of input/output impedance for guitar and headphone interfacing
- Frequency Response: Designing for flat frequency response across audio spectrum with proper capacitor selection
- PCB Layout: Practical PCB design skills including component placement, routing, and ground plane design
- Analog Audio Quality: Understanding THD, SNR, and other audio performance metrics
- Power Management: Battery-powered design considerations for portable electronics
- Mechanical Design: Enclosure integration, panel layout, and user interface design
Contributors
This project was designed and built as an individual project to explore analog audio circuit design and create a practical tool for guitar practice. The project demonstrates the application of operational amplifier theory to real-world audio applications.
Designer & Builder: Shenal Ranasinghe

Demonstration Day
Project team at demonstration day showcasing the completed guitar headphone amplifier unit.
Acknowledgements
Thanks to the online DIY audio community for inspiration and to the various resources on op-amp audio design that informed this project. Special appreciation for the makers and builders who share their knowledge and help others learn electronics through practical projects.